
Odoo UAE E-Invoice processing with Azdan
Prepare and post a customer invoice in Odoo, check its progress in Azdan UAE E-Invoice, and return to Odoo to complete your review. This guide covers daily invoice processing, failed submissions and credit notes.
Your company’s Azdan connection, submission rules and return of results should already be set up. Use your normal finance role. The Odoo screens show public demo records; menus and additional e-invoicing fields may differ in your account. Follow the same invoice number throughout your own checks.
1. Open the customer invoice list
In Accounting, go to Customers > Invoices. Open an existing draft, or click New to enter an invoice. If you invoice from a sales order, use your usual sales-order invoicing process and continue with the invoice it creates.
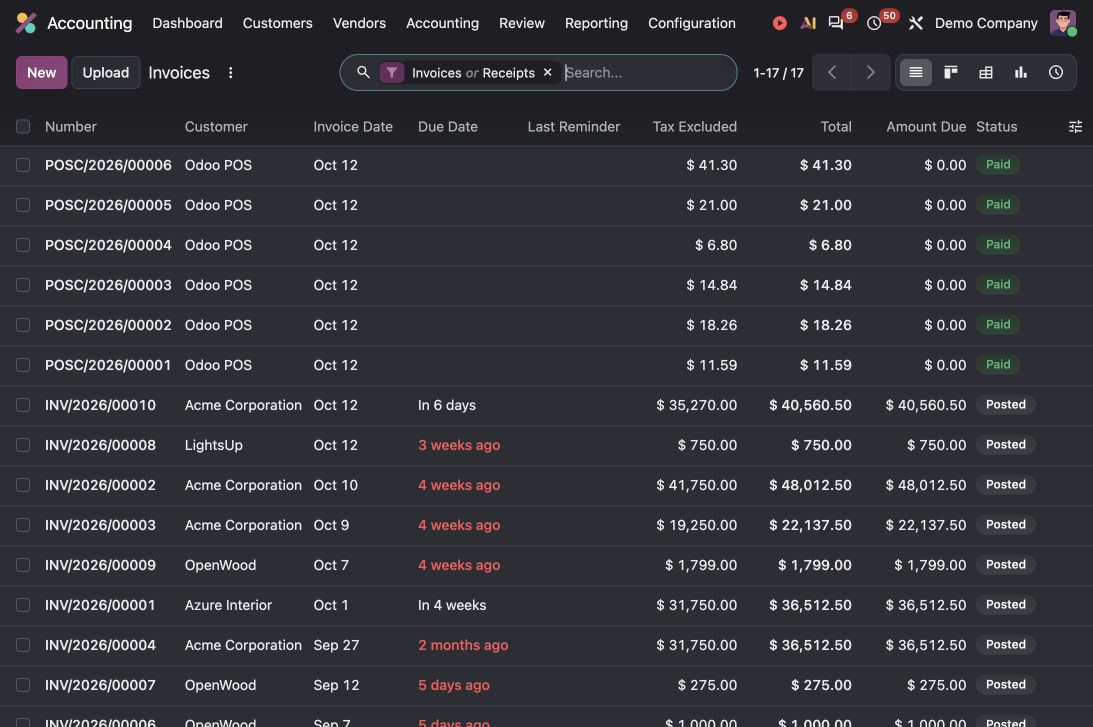
Search for an existing invoice before creating another one for the same sale. Draft, Posted and Paid describe Odoo accounting or payment states; they do not confirm Azdan delivery.
2. Complete the customer and invoice details
Work on the draft invoice before it is released for e-invoicing. Check the issuing company in the top bar and confirm that you are billing from the correct legal entity.
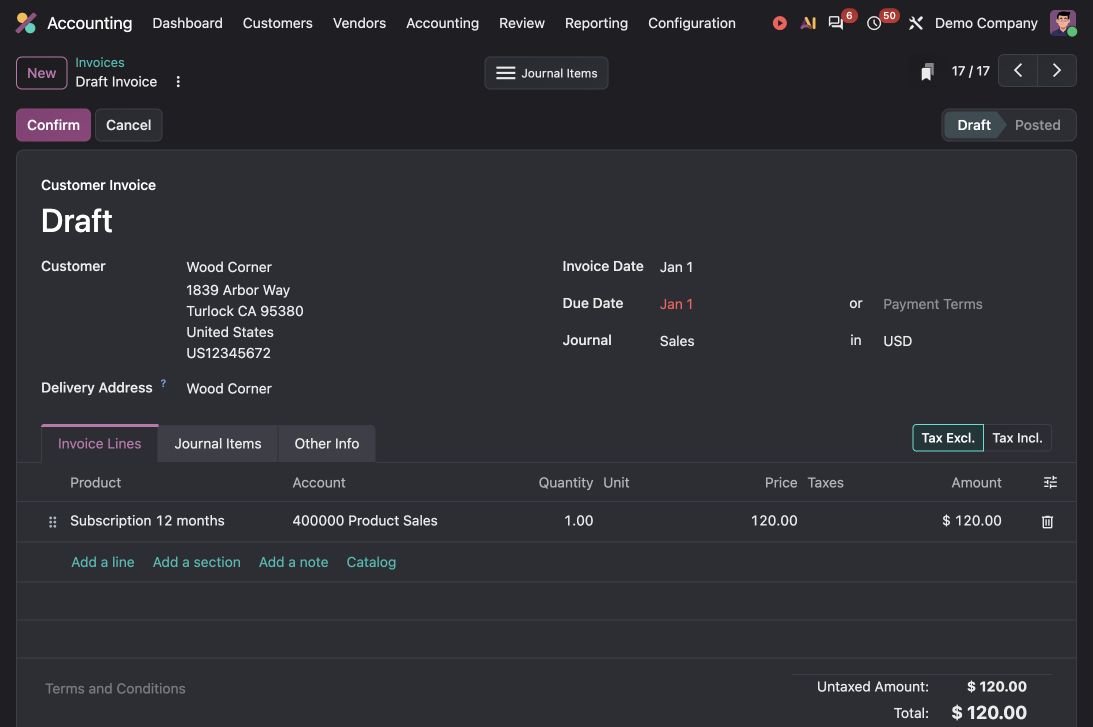
- Customer: Check the legal name, billing address and tax registration. Review the buyer’s electronic delivery identifier in the customer or integration fields your company uses.
- Invoice Date and payment terms: Enter the issue date and check the due date or agreed payment terms. Do not leave an old date from a copied or unfinished draft.
- Journal and currency: Confirm the sales journal and invoice currency. Review the exchange rate where applicable.
- Delivery Address: Check it when the supply requires a separate delivery address. Resolve missing customer details before posting.
A draft does not yet create the posted accounting entry. If you correct the customer record, also check the address and tax details on the current invoice.
3. Check references and payment information
Open Other Info. Review the references and payment information that should accompany this invoice.
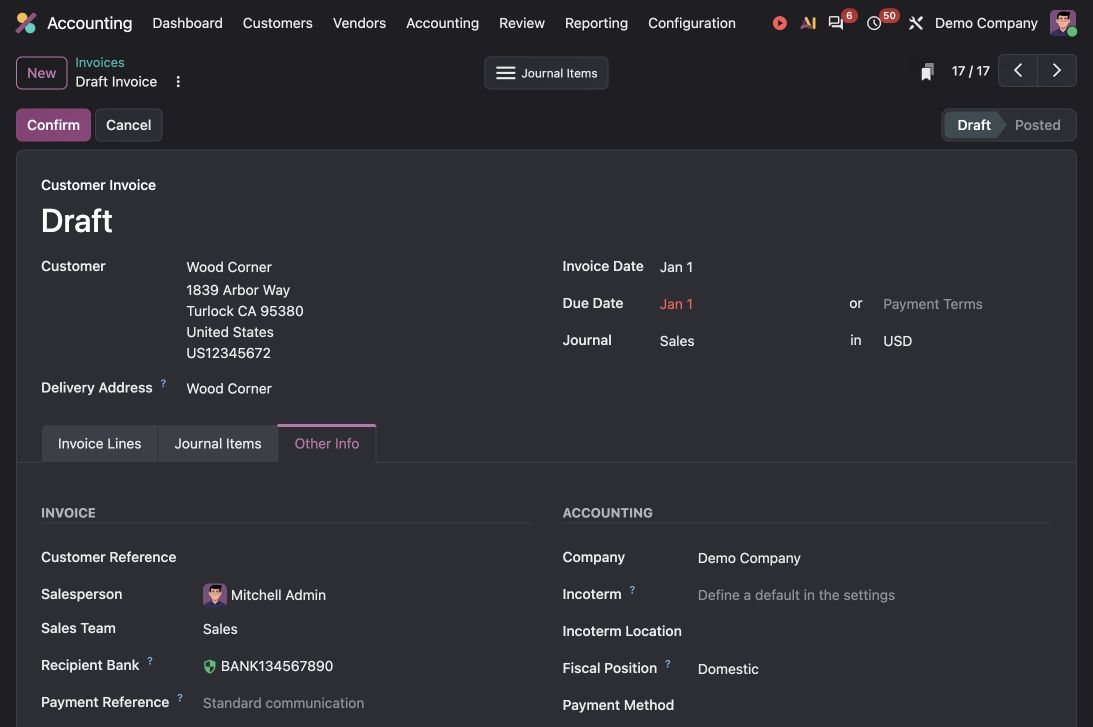
- Customer Reference: Enter the customer’s purchase order or other agreed reference where your process uses this field.
- Recipient Bank and Payment Reference: Check the payment account and reference your customer should use. Use the payment details approved for the issuing company.
- Company: Confirm the legal entity again, particularly when you work with more than one company.
- Fiscal Position: Check that the selected treatment is appropriate for the customer and supply. Review any Incoterm and delivery information your invoice requires.
Any extra buyer identifier, supply classification or e-invoicing reference belongs in the fields defined during your company’s setup. Complete required fields before release; the standard Odoo screen above does not display custom Azdan fields.
4. Review invoice lines and VAT
Open Invoice Lines. Use Add a line for a new item. Check the product description, quantity, unit, unit price, discount where used, and tax on every line. Compare them with the approved sale or service record.
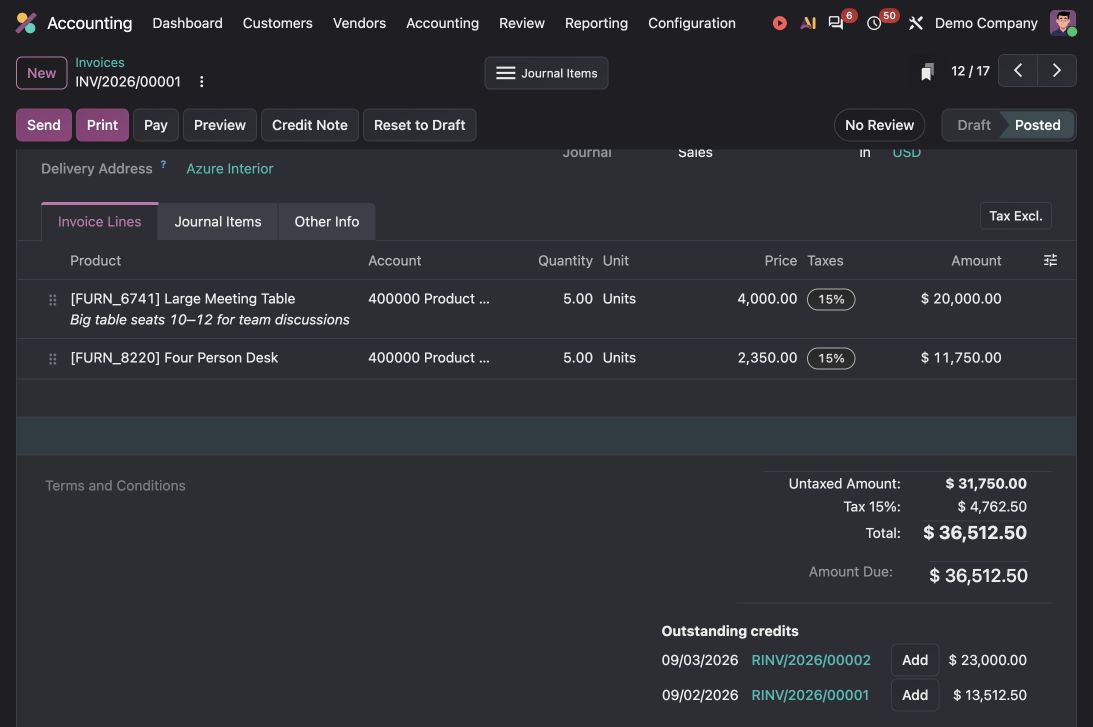
- Check the net amount of each line and the Untaxed Amount. Confirm that discounts are reflected correctly.
- Review the tax selected on each line and the tax total. Apply your approved UAE VAT treatment; resolve any unexpected tax before posting.
- Check Total against the agreed invoice value. Amount Due is the outstanding balance and may differ after payments or credits.
The public demo uses USD and a 15% sample tax. These illustrate where amounts appear in Odoo; use your own currency and approved tax codes. Do not copy the sample tax treatment.
5. Confirm the invoice and release it for submission
Complete your normal review and approval, then click Confirm on the draft invoice. Check that the status changes to Posted and note the final invoice number.
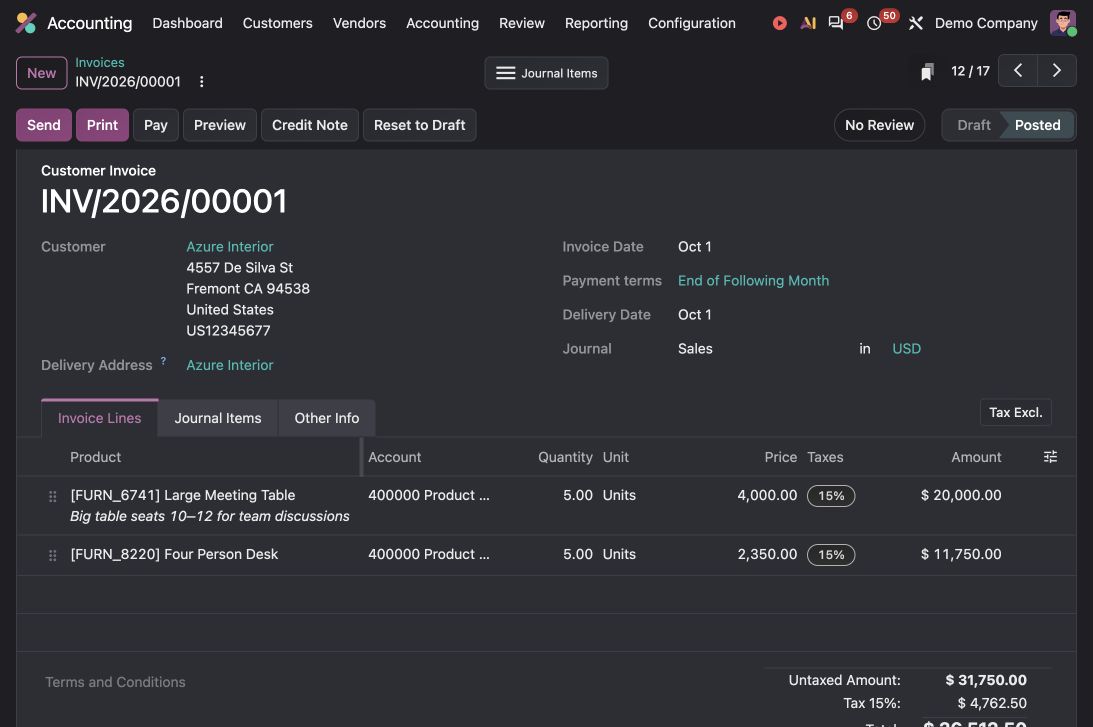
Confirming posts the accounting entry and assigns the invoice number. Complete any separate e-invoicing release action your company uses. Some connections pick up eligible posted invoices automatically; others require a release step.
The standard Send action is not proof that Azdan received the invoice. Follow your company’s configured Azdan process and verify the result in Transactions. Do not send the same invoice through another electronic delivery route.
6. Find the invoice in Azdan
After release, the connection transfers the Odoo invoice details for preparation and validation in Azdan. You keep the original Odoo invoice number and do not enter the invoice a second time.
| From Odoo | Used in the electronic invoice |
|---|---|
| Company and customer details | Seller and buyer identities, addresses and delivery identifiers. |
| Invoice number, dates and currency | Document reference, issue date, payment terms and currency. |
| Invoice lines, taxes and totals | Descriptions, quantities, prices, tax breakdown and amount payable. |
| References and payment details | Buyer references and instructions for payment. |
In Azdan, open Invoicing > Transactions > Outbound. Enter the Odoo invoice number in Search transactions and open the matching result.
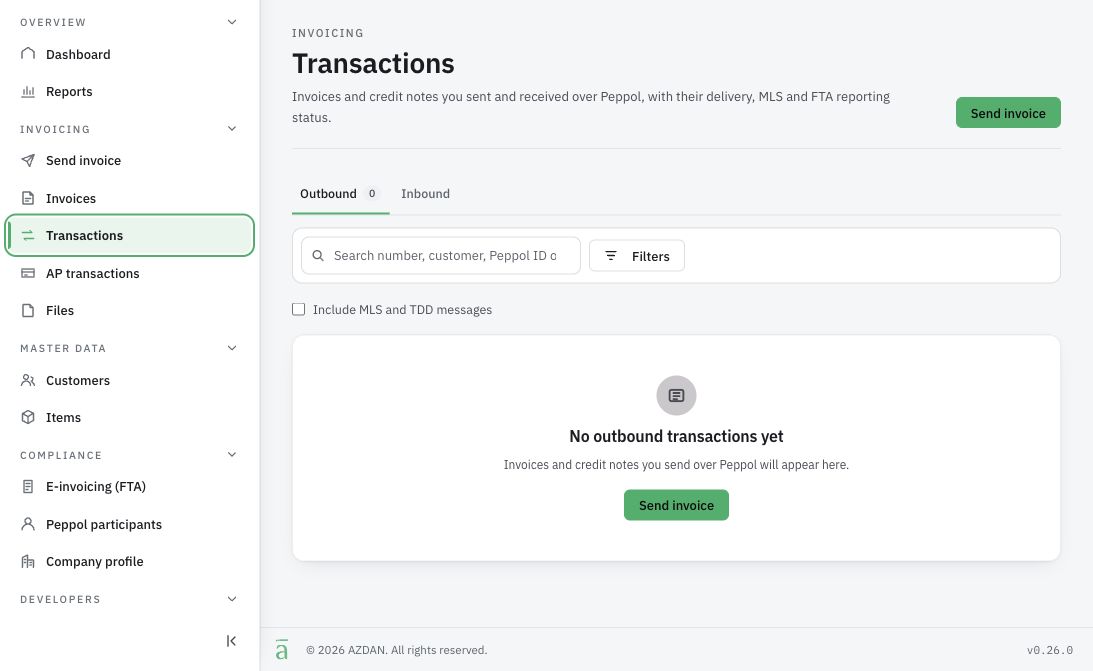
Match the issuing company, invoice number, customer, currency and total to Odoo. Check the invoice date and VAT where shown. If the record is missing, clear restrictive filters, check release in Odoo and allow your normal processing interval. Escalate a missing transfer with the invoice number and release time.
7. Check each result in Azdan
Open the transaction and review each result separately. Validation, delivery, the receiver response and FTA reporting can finish at different times.
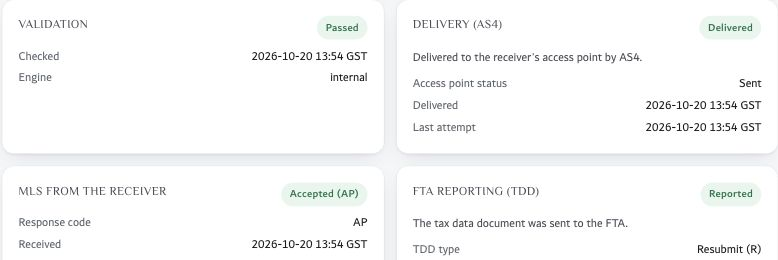
| Result | What the accountant should check |
|---|---|
| Validation | Passed means the document passed Azdan’s checks. For a failure, open the message and identify the missing field or inconsistent amount. |
| Delivery AS4 | Delivered confirms delivery to the receiving provider. It does not confirm the customer’s commercial approval or payment. |
| MLS from the receiver | Read the actual response and any reason provided. A technical acceptance is separate from the buyer agreeing the invoice. |
| FTA Reporting TDD | Read the reporting result and response details. Reported indicates that tax data was sent; the label alone does not establish FTA acceptance. |
Retain the Azdan transaction reference with the Odoo invoice. Save the available document and response records through your company’s normal filing process when evidence is needed.
If all required results are satisfactory, continue to step 10. Follow step 8 for a pending, failed or rejected result. Use step 9 when the invoice needs a financial correction after issue.
8. Resolve an invoice that needs attention
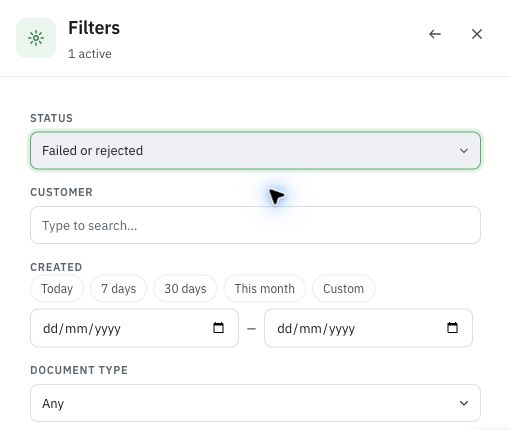
In Azdan Transactions, open Filters, choose Failed or rejected, set the date range and apply the filter. Review In progress separately. Open the affected transaction and read the exact message before making a change.
- Missing or incorrect information: Identify the field named in the message. Correct the source information in Odoo under your normal controls, then check the invoice itself.
- Rejected before delivery: Once the correction is approved, use the configured retry or release process. Check that the invoice has not already been delivered before submitting it again.
- Pending delivery, receiver response or reporting: Check the latest result and time. Give your administrator the Odoo invoice number, Azdan reference and exact message. Avoid repeated manual submissions while a retry is in progress.
- Incorrect amount after issue: Follow the credit-note process in step 9. Do not use Reset to Draft simply to overwrite an invoice already issued to the customer.
After a retry, reopen the transaction and check all four results again. Keep unresolved invoices on the follow-up list with a named owner.
9. Create a credit note when a correction is required
In Accounting > Customers > Invoices, open the original posted invoice and click Credit Note. Enter the reason, review the journal and choose the approved reversal date.
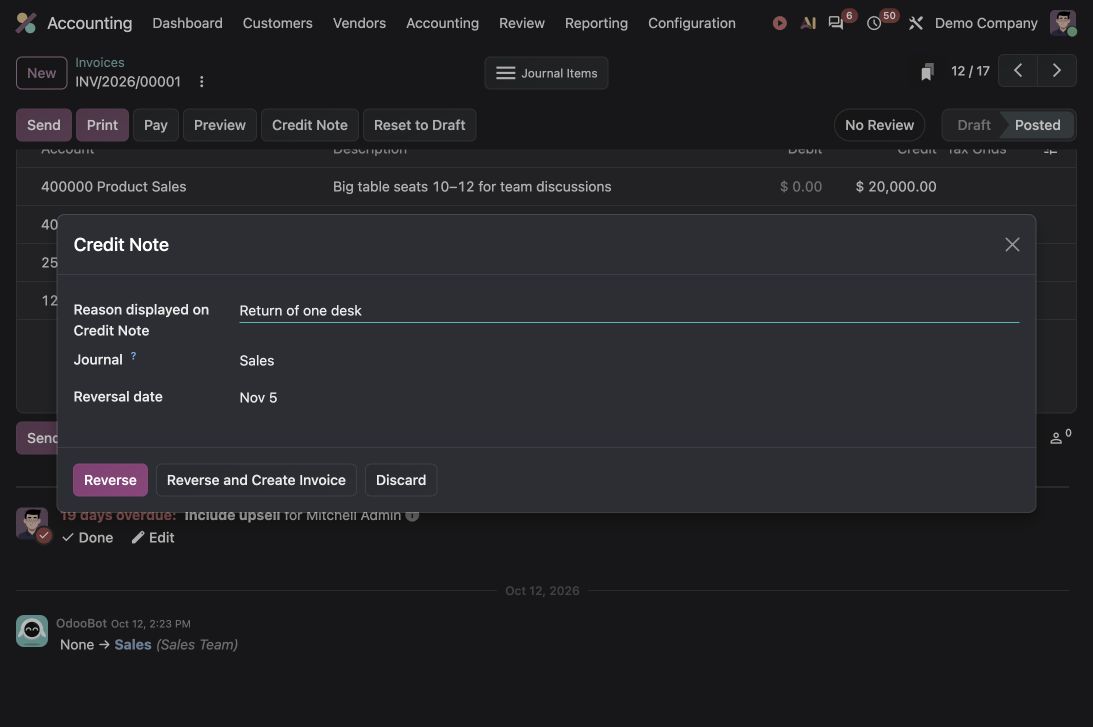
Choose Reverse to open a draft credit note for review. Adjust the lines and quantities to the approved correction, check the tax and total, and click Confirm when it is ready. Reverse and Create Invoice automatically posts and reconciles the credit note with the original invoice, then opens a replacement draft invoice. Use that action only when this is the intended correction.
Keep the original invoice reference and the reason with the credit note. Check that the information required by your Azdan connection is completed before release.
Check the posted credit note in both systems
The credit note has its own document number. You can reopen it from Accounting > Customers > Credit Notes.
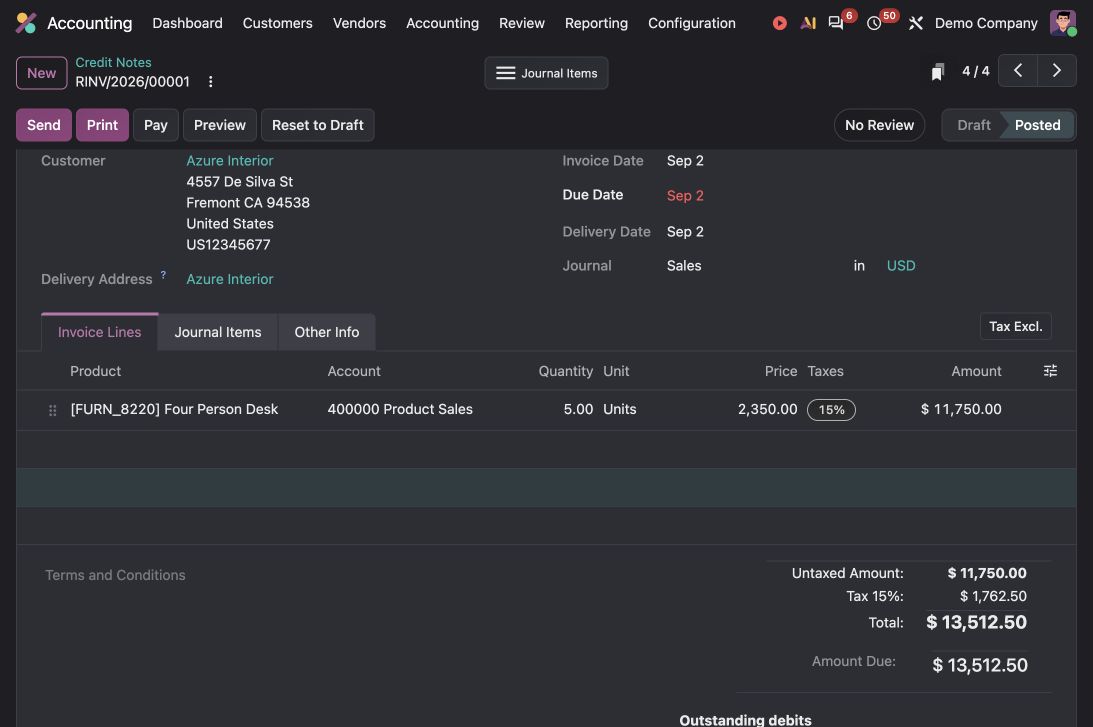
- Check the customer, original invoice reference, correction reason, quantities, tax and total. Retain both documents in the audit trail.
- Release the credit note through your configured Azdan process. Search Azdan using the credit-note number and review validation, delivery, the receiver response and reporting separately.
- Check the returned results on the Odoo credit note. Apply or reconcile the credit to the correct invoice under your normal accounting controls.
Do not record a customer payment simply because a credit note was delivered. If a replacement invoice is required, process and track it as a separate invoice.
10. Return to Odoo and complete the review
Go back to Accounting > Customers > Invoices and search for the original invoice number. Reopen the invoice and match its customer, currency, VAT and total to the Azdan transaction.
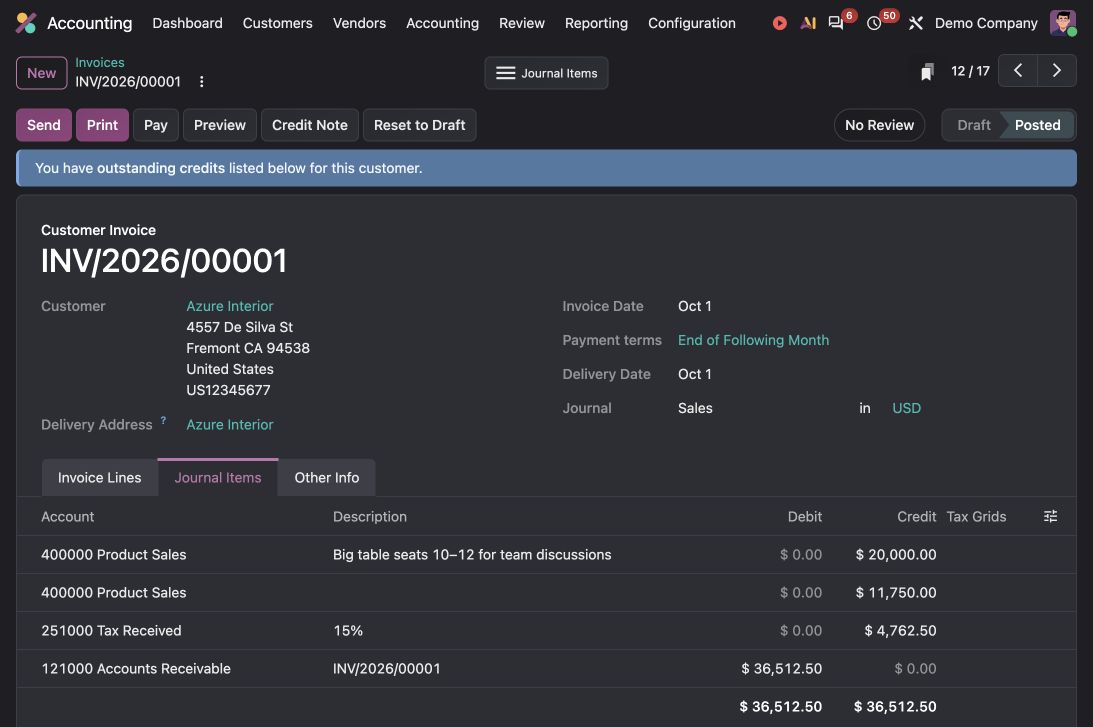
- Open the e-invoicing fields or linked result record provided by your company’s integration. Check the Azdan reference and the latest returned results against Azdan.
- If Azdan has a newer result, ask your administrator to check the return update. Do not create another invoice to refresh a status.
- Use Journal Items when an accounting check is needed. Confirm the receivable, revenue and tax entries reflect the invoice and any approved correction.
- Keep collection activity separate. Delivery or reporting does not mark the invoice Paid; payment and reconciliation follow your normal Odoo process.
The review is complete when the Odoo invoice is matched to its Azdan transaction, amounts agree, returned results have been checked and each outstanding issue has an owner. Custom Azdan fields are not shown in this standard Odoo demo screen.
Related guides
Azdan UAE E-Invoice documentation