
Microsoft Dynamics 365 Business Central Online UAE E-Invoice processing with Azdan
Review and issue an invoice in Microsoft Dynamics 365 Business Central Online, track it in Azdan UAE E-Invoice, then return to the original accounting record to finish your checks.
The connection is already set up. This guide follows Business Central Online’s Sales Invoice and Posted Sales Invoice pages. Use the invoice already created by your sales, project or service process when one exists. The public screenshots use demonstration companies and non-UAE tax settings. Action groups may move with your version or personalization; use Search to find the named page.
Follow your company’s existing approval, e-invoice release and result-recording process. The screenshots show the accounting screens; the Azdan release action and returned-result fields depend on your company’s configuration.
1. Open Sales Invoices
Use the search icon, enter Sales Invoices and open the page. Find any existing draft for the sale. Choose New only when there is no existing invoice. If the invoice has already been posted, use Posted Sales Invoices instead.
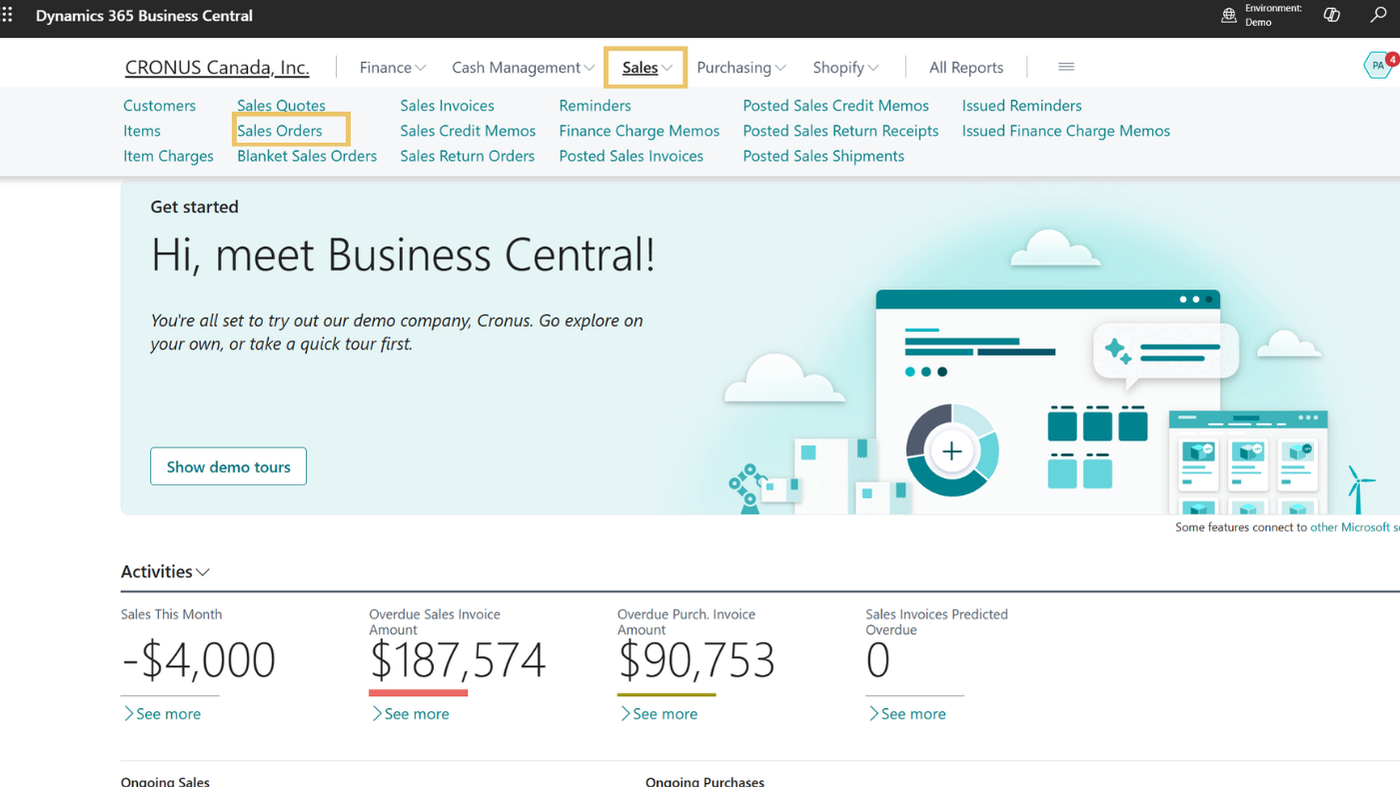
If you invoice from a sales order, use that order’s normal posting route. For shipments that have already been posted, use the approved shipment-invoicing process rather than adding the same inventory lines again.
2. Review the customer and General details
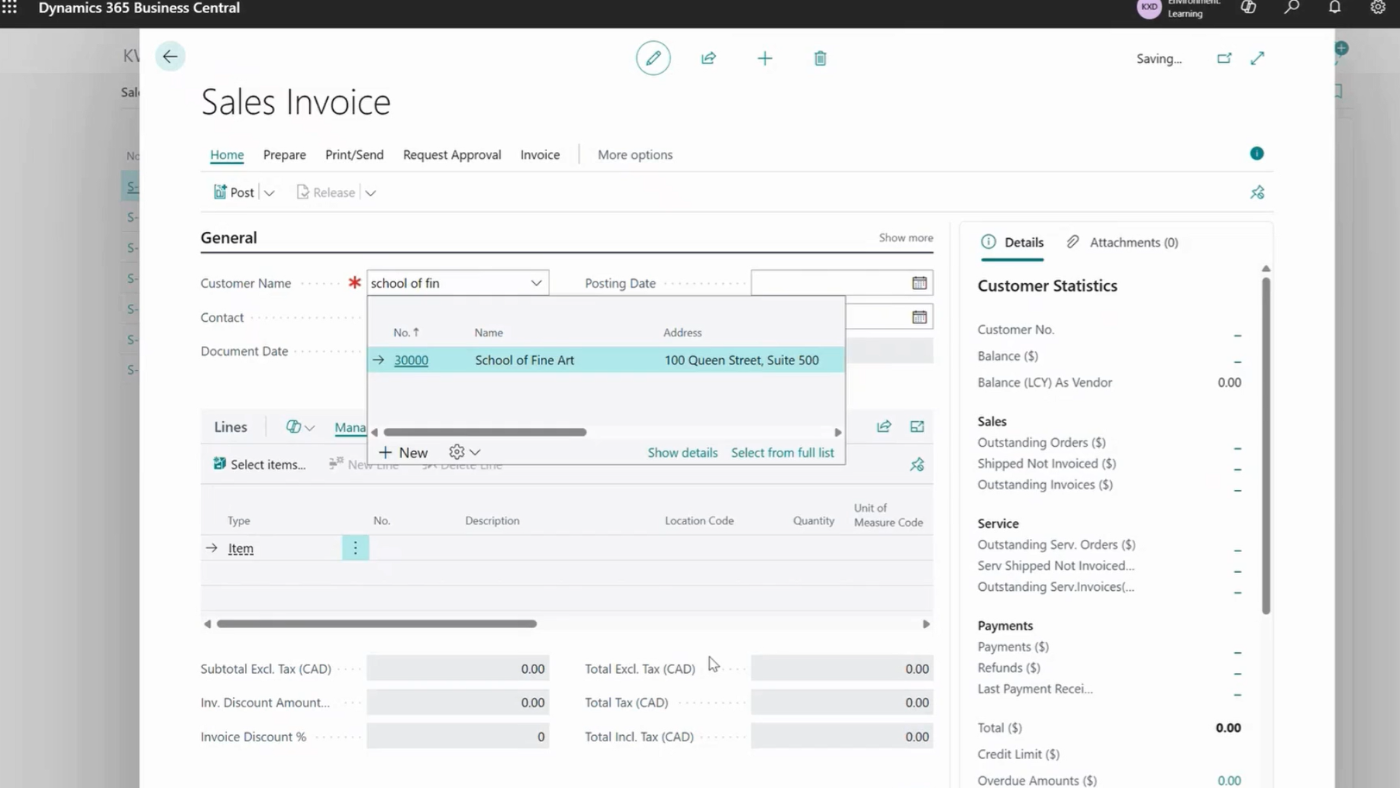
- Select the Customer Name and confirm the sell-to and bill-to customer details. Check the legal address, VAT registration and electronic delivery information used by your connection.
- Check Document Date, Posting Date, Due Date, payment terms and currency. Review any required VAT date shown by your localization.
- Review the customer purchase-order reference, usually recorded in External Document No., and the relevant shipping and billing details.
- Investigate an overdue-balance or credit-limit warning under your company’s approval rules before posting.
3. Check lines, discounts, VAT and total
Review each line’s Type, No., description, quantity, unit of measure, unit price and discount. Check the relevant posting groups and tax calculation. Reconcile the total excluding tax, tax amount and total including tax.
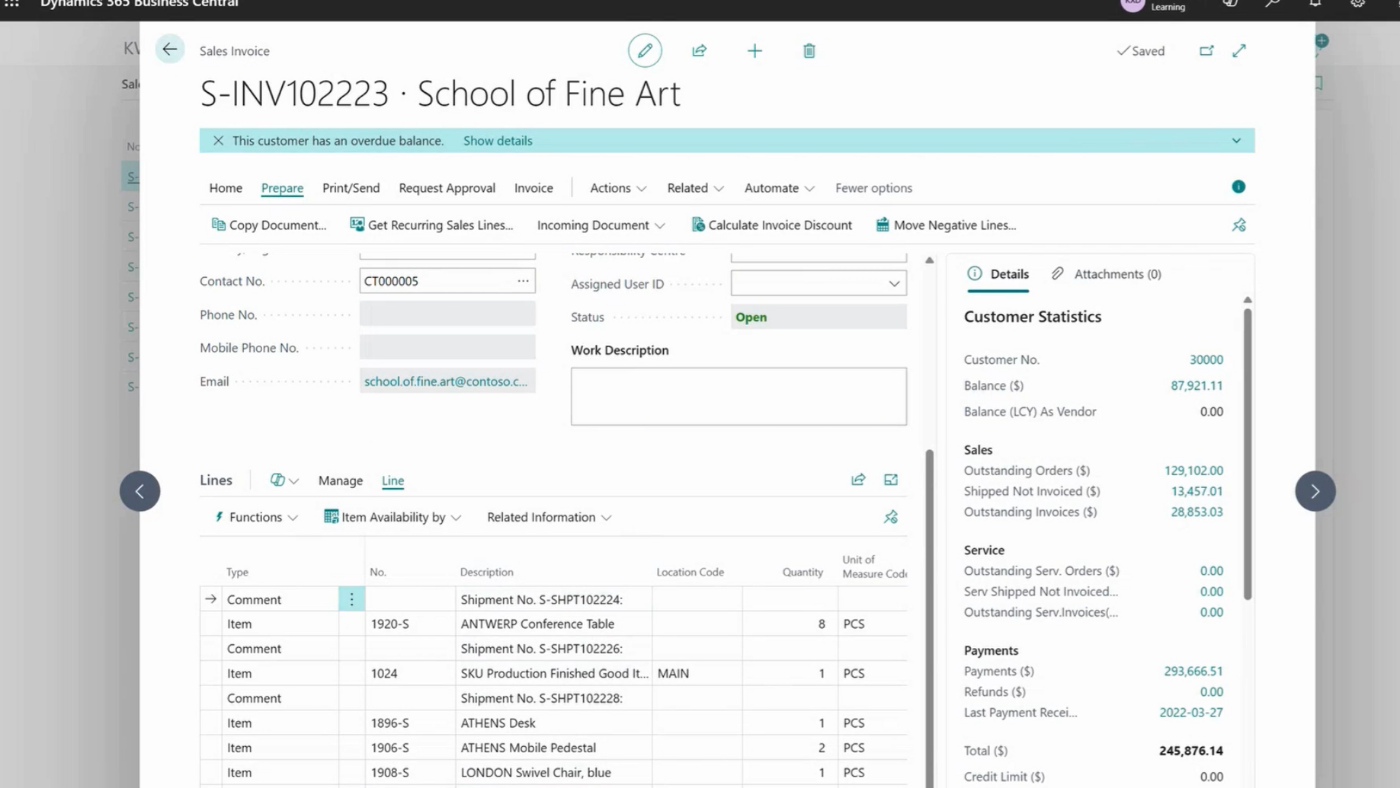
When combining already-posted shipments, use Get Shipment Lines and select the intended uninvoiced lines. For a direct invoice, enter the approved lines normally. Do not use both methods for the same goods.
4. Preview, approve and post
Use Preview Posting to inspect the entries before posting. Review the customer, general-ledger, VAT and item entries that apply to this invoice. Resolve any posting errors and complete the configured approval process.
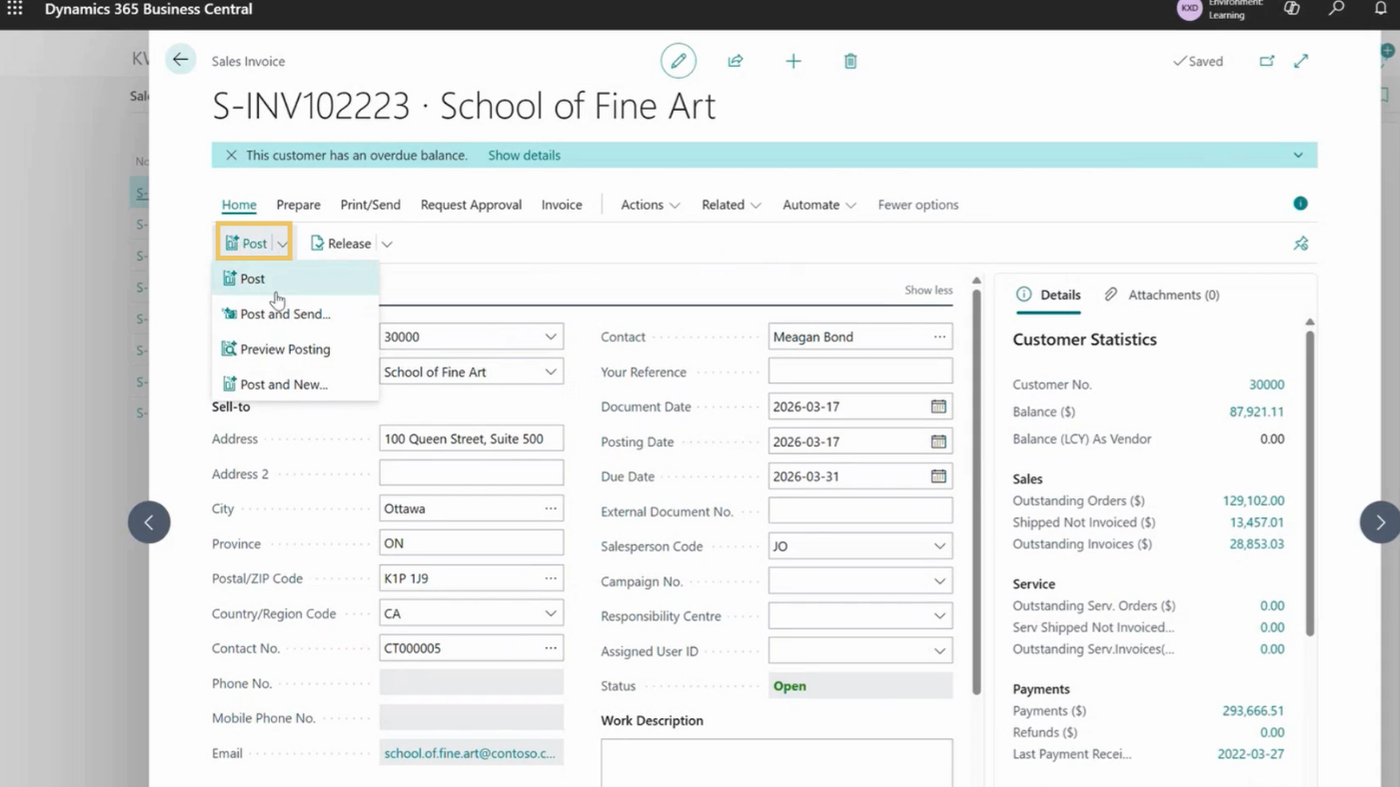
When authorized, choose Post and confirm. Open the resulting Posted Sales Invoice and note its final number. A draft number and the posted number can differ. Use the posted number when searching in Azdan.
The Released status, a PDF email and Post and Send are not, on their own, proof that Azdan received the document. Check the configured e-invoice process and its result.
5. Let the connection prepare the e-invoice
After the configured posting/release event, your existing connection prepares the electronic document from Microsoft Dynamics 365 Business Central Online. You continue to work with the original invoice. Do not enter the same sale again in Azdan.
The connection translates the accounting record into the format used for electronic exchange. It carries the invoice details into the appropriate fields; it should not change the agreed sale, tax treatment or document total.
| Information in Microsoft Dynamics 365 Business Central Online | What to match in Azdan |
|---|---|
| Posted invoice No., posting/document dates and due date | The final invoice number, issue date and due date. Use the issued number rather than a draft reference. |
| Company and sell-to/bill-to customer details | The correct seller and buyer, legal names, addresses and electronic delivery identifiers. |
| Sales lines, shipment references, discounts and VAT | Descriptions, quantities, units, prices, discounts and the taxable amounts. |
| Currency and posted totals excluding/including tax | The invoice currency, tax breakdown and original document total. |
| Order references and payment terms | The customer purchase order, other required references and agreed payment information. |
Azdan validates the document before delivery. If a required value is missing or the figures do not reconcile, use the validation message to identify what needs correcting. A PDF is a readable copy; the connection also sends structured invoice data.
6. Find the invoice in Azdan
Open Invoicing > Transactions > Outbound in the Azdan portal. Search using the Microsoft Dynamics 365 Business Central Online posted sales invoice number. Open the matching transaction.
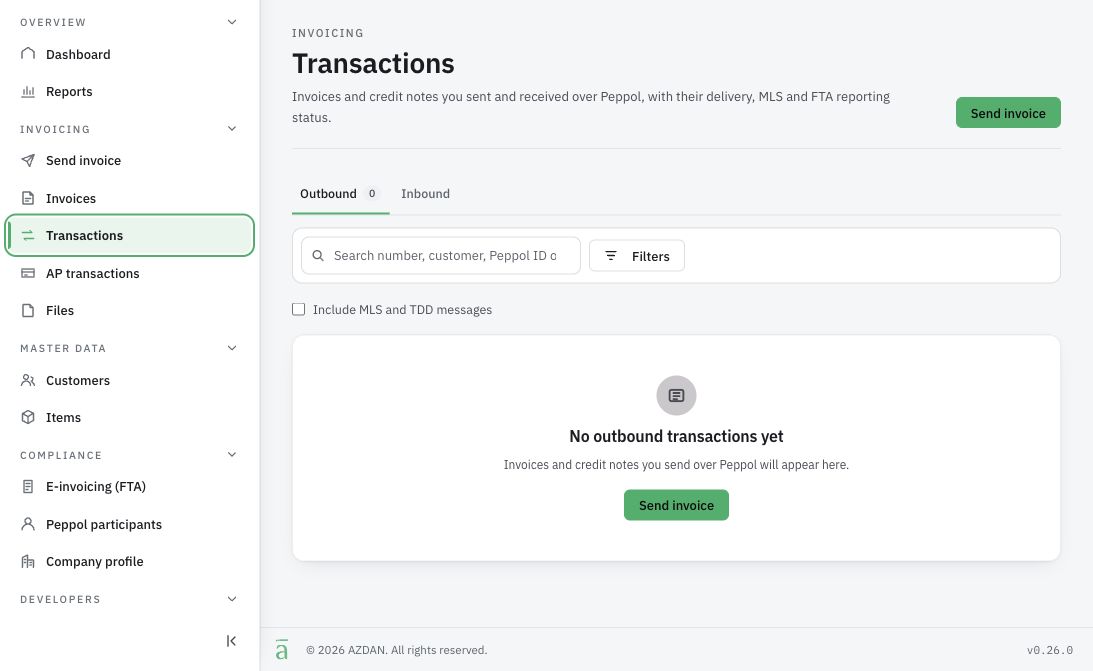
- Confirm the selling company and buyer before comparing amounts. The same number may appear in more than one company or document series.
- Match the invoice date, currency, VAT and document total. Compare the original invoice amount, rather than the remaining customer balance after payments or credits.
- Keep the Azdan transaction reference with the invoice so colleagues can find the same record.
If you cannot find it, clear restrictive filters and check that the Microsoft Dynamics 365 Business Central Online invoice completed its required approval and release. If it remains missing after your normal processing interval, give the administrator the company, invoice number and release time. Keep the original invoice; creating a second one can duplicate the sale.
7. Review delivery, the receiver response and FTA reporting
Open the transaction details and read each outcome separately. A successful result in one stage does not close an issue in another stage.
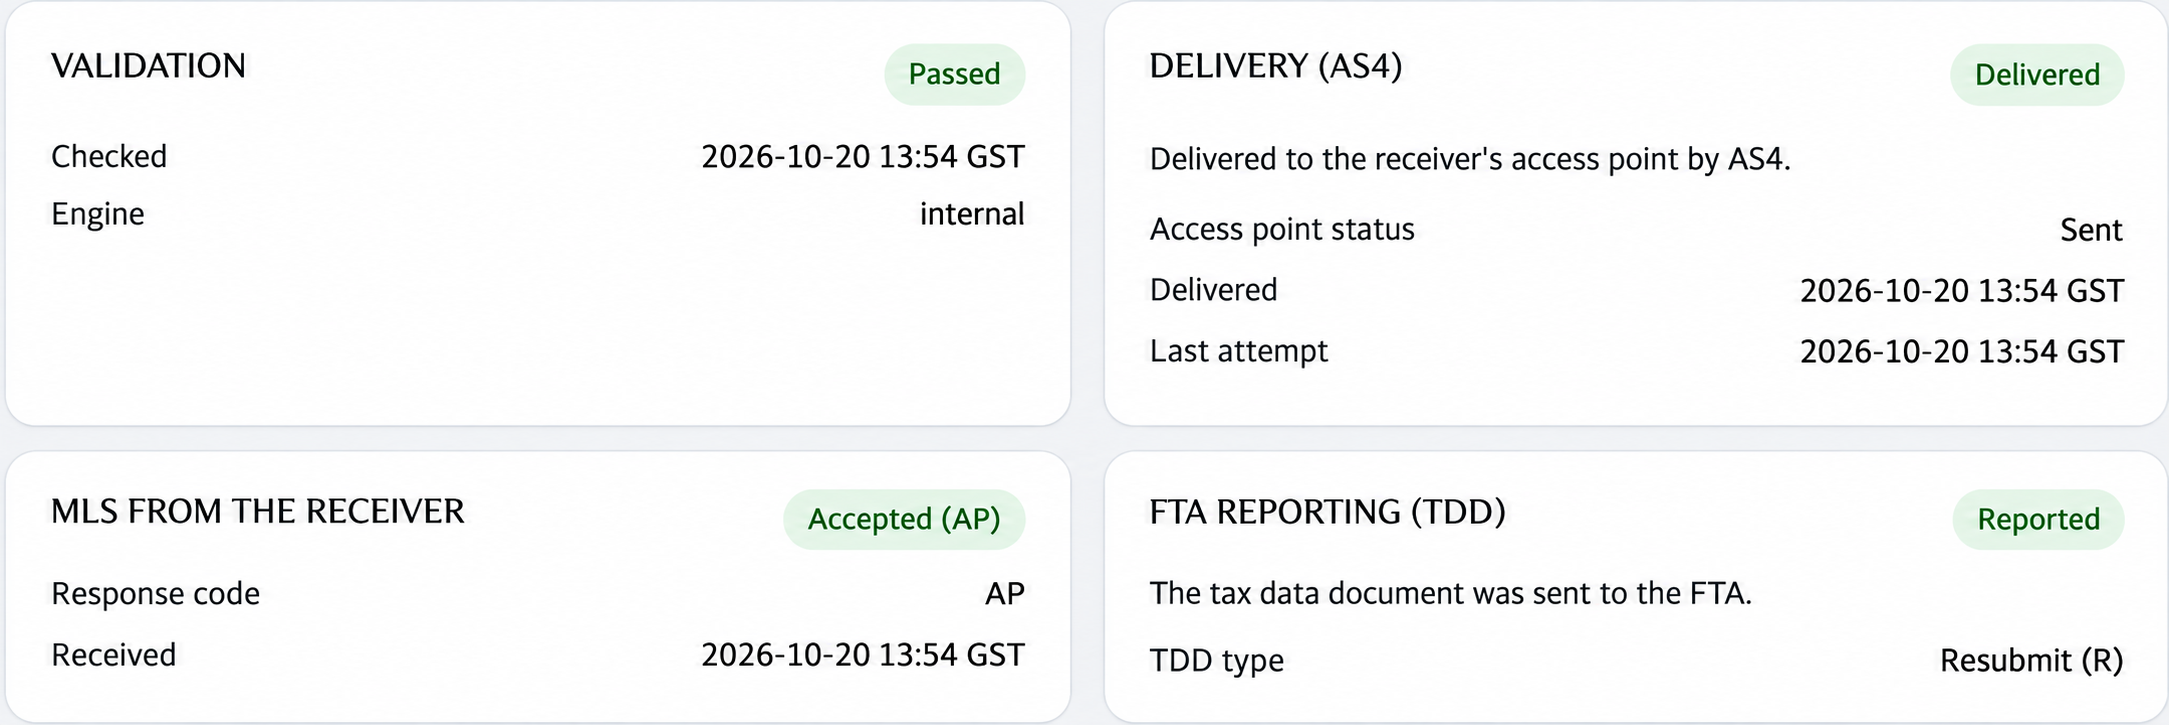
| Result | What to check |
|---|---|
| Validation | Passed means Azdan’s document checks passed. For a failure, read the field, rule or amount identified in the message. |
| Delivery (AS4) | Delivered confirms delivery to the receiving provider. It does not confirm buyer approval or payment. |
| Receiver response (MLS) | Read the response and any reason supplied. Technical acceptance is separate from commercial approval of the invoice. |
| FTA Reporting (TDD) | Review the reporting result and available response details. Reported means tax data was sent; that label alone does not establish FTA acceptance. |
The results may arrive at different times. Retain the available invoice, response and reporting records under your company’s filing process. Record any outstanding result and who will follow it up.
8. Resolve an exception without duplicating the invoice
In Azdan Transactions, open Filters, choose Failed or rejected, set the date range and apply the filter. Review In progress separately. Open an affected transaction and read its message before taking action.
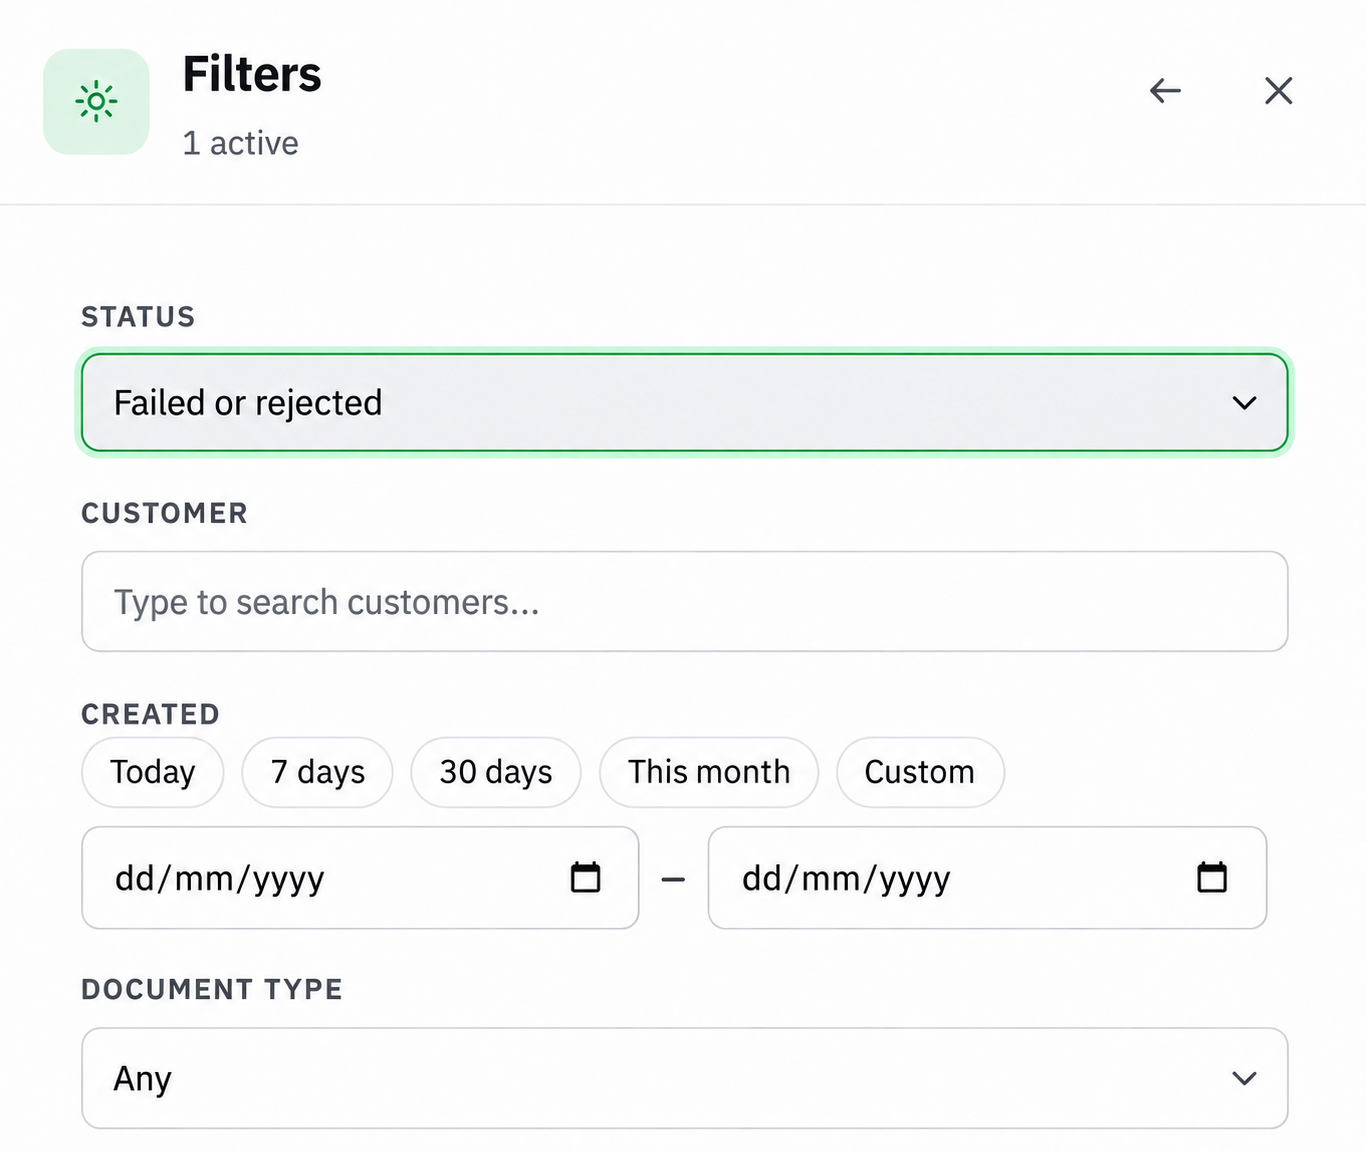
- Incorrect customer or invoice information: Compare the named field with Microsoft Dynamics 365 Business Central Online. Updating a customer master does not necessarily change an invoice already issued or prepared for sending.
- Failure before delivery: Have the accounting owner approve the correction, check whether any attempt already reached the receiving provider, then use your configured correction and retry process.
- Still in progress: Allow scheduled processing and automatic retries to complete. Avoid repeated submissions. Escalate a stalled transaction with its invoice number, Azdan reference, exact message and time.
- Receiver or FTA rejection: Assign the message to the responsible colleague and follow the required correction route. A delivered invoice can still have an unresolved receiver or reporting result.
Do not delete, cancel or recreate a posted Microsoft Dynamics 365 Business Central Online invoice simply to refresh an e-invoicing result. If the original accounting document must change, the finance owner should decide whether a credit note or another approved correction is required.
9. Create a sales credit memo
Find the original Posted Sales Invoice. Use Create Corrective Credit Memo where available to prepare a credit based on that invoice. For a paid invoice or a partial correction, use the sales-credit-memo process appropriate to the transaction.
Alternatively, open Sales Credit Memos, create a record and use Copy Document with Document Type = Posted Invoice and the original document number. Review the copied header, lines and application details before posting.
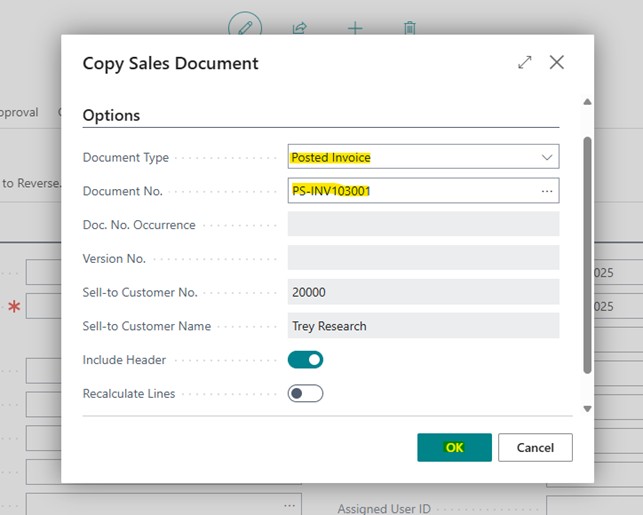
- Keep only the quantities or amounts being credited. Review VAT, discounts and the original-invoice reference.
- Check whether the correction should affect stock; use the return process when goods are physically returned.
- Confirm the invoice application and any existing payments or credits. Do not use a credit merely to clear an e-invoicing error.
- Preview the posting, obtain approval and post the credit. Retain the final Posted Sales Credit Memo number.
Complete the required review and release the credit through the existing Microsoft Dynamics 365 Business Central Online connection. Search for its own number in Azdan, confirm the original invoice reference and credited amounts, then repeat the status checks in steps 6–8. Keep both documents and their results together. Applying a credit to the customer balance or issuing a refund is a separate accounting task.
10. Return to the original Microsoft Dynamics 365 Business Central Online invoice
Search for Posted Sales Invoices and open the original posted number. Review its totals, related customer ledger entries and any corrective credit memo.
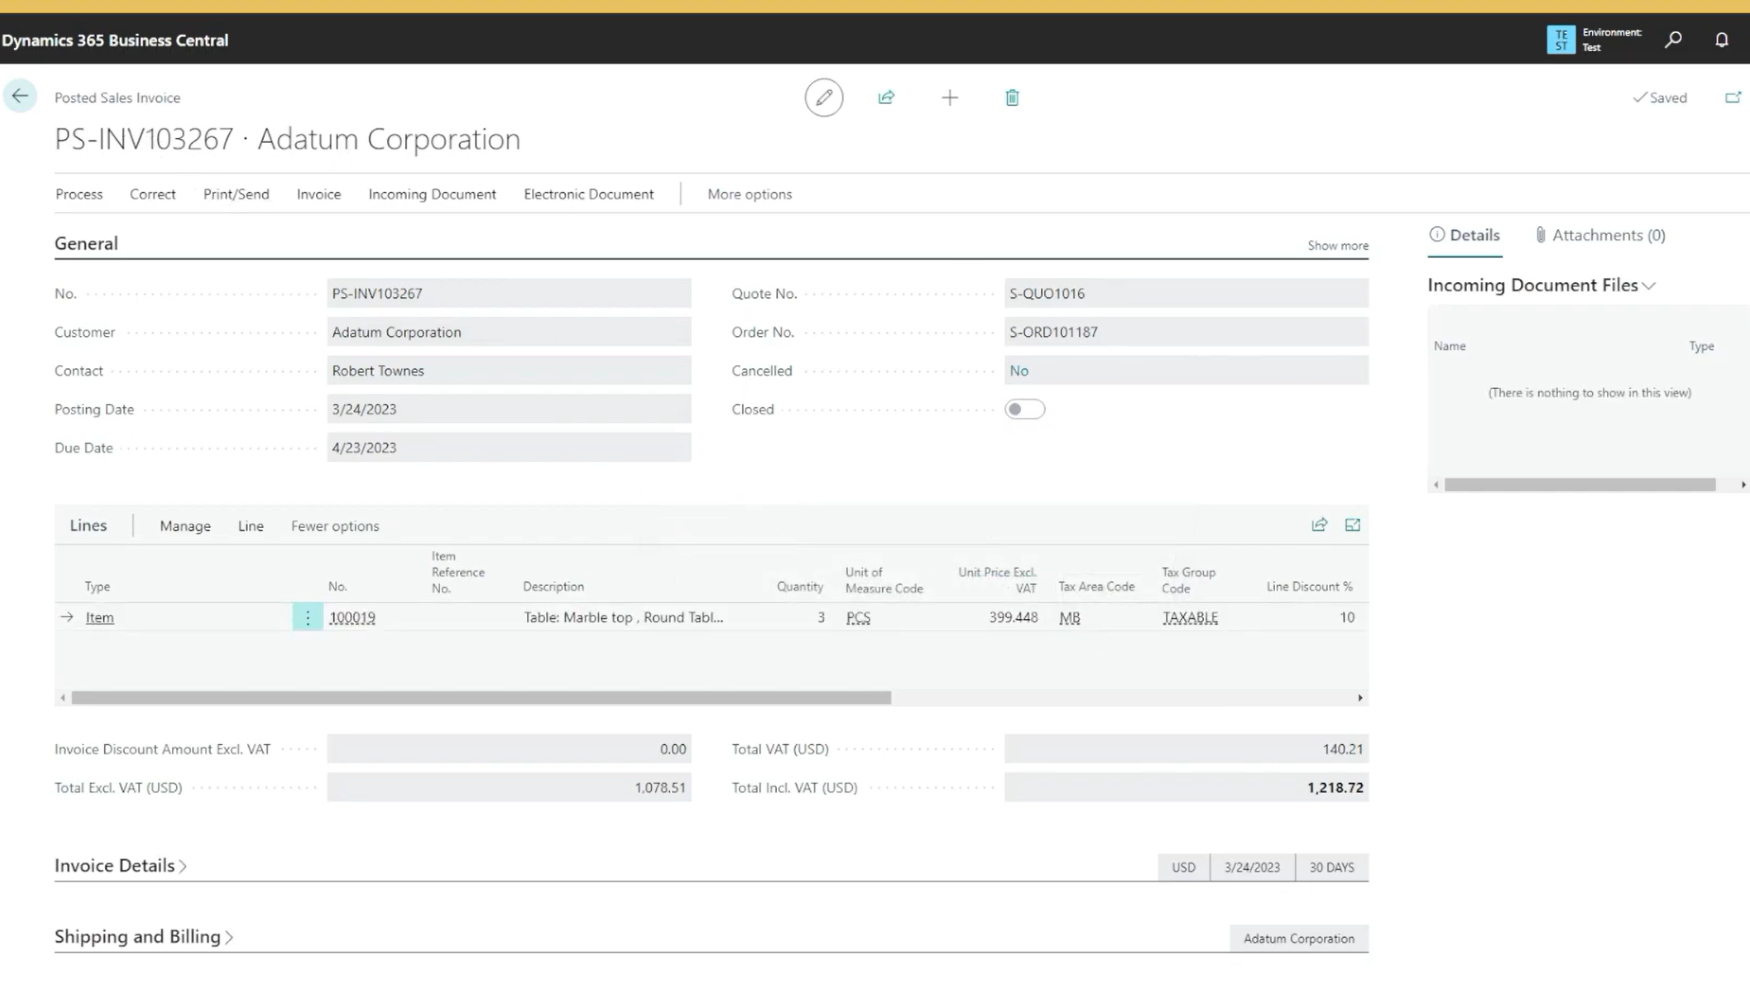
- Match the company, buyer, invoice number, currency, VAT and original total to the Azdan transaction.
- Open the integration result fields, linked record, note or attachment used by your company. Check the Azdan reference, latest outcomes and last update time.
- If the returned information is missing or older than Azdan, ask the administrator to investigate the return update. Keep the transaction reference and latest portal result available.
- Check any related credit note under its own number. Review payment, allocation and refund records separately from electronic delivery.
Finish the review when the accounting record and Azdan transaction match, the amounts agree, the returned results have been checked and every unresolved issue has an owner.
The public Microsoft Dynamics 365 Business Central Online screens in this guide show standard accounting functions. Your company’s existing configuration determines the release action and where Azdan results appear.
Related guides
Azdan UAE E-Invoice documentation